
We love orange and cream sandwiches...but we like orange and dairy cream roll cakes way more!
*Recipe* (For 4 Little Orange Bears)
1. Place pattern paper in a 25 cm square mold. This time, we used pattern paper with just the little bear's noses drawn on it. We drew the noses in 5 cm intervals.
2. Place parchment paper on top of 1 and place a light layer of vegetable oil.
3. Split 4 eggs into yolk and egg whites.
4. Whip the egg whites lightly until they turn completely white.
5. Mix while adding 100 g of granulated sugar. Continue whipping until it is fully whipped.
6. Set aside a bit more than 1 tablespoon from 5.
7. Mix in the yolks from 3 into the remainder of 6 and whip even further.
8. Mix 50 g of cake flour into 7, stir lightly at a low speed, switch to a rubber spatula, and stir until the powder just dissolves.
9. Set aside a bit more than 1 teaspoon from 8.
10. Stir in 1 teaspoon of cocoa powder into 9.
11. Mix 6 into 10. (If the batter is hard, please add a bit of 8.)
12. Place 11 into a piping bag.
13. Use 12 to draw the little bears' faces on 2.
14. Bake 13 in an oven preheated to 200 degrees for 1 minute.
15. Pour the remainder of 9 into 14 after it is done baking and make it flat.
16. Put it on a board, remove the large bubbles and bake it in an oven preheated to 200 degrees for 7 minutes and 30 seconds.
17. Once it is done baking, put it on a board and prevent contraction.
18. Place parchment paper on top to prevent it from drying and let it cool.
19. Take a large can of oranges (with 240 g of fruit) and remove the fruit from the syrup.
20. Set aside the oranges with a good shape from 19. (In the video, there are 8, but 4 is enough)
21. Add 15 g of sugar to 150 g of dairy cream, and whip it hard. (We recommend dairy cream with over 45% fat, as it whips harder and is easy to roll.)
22. Add and mix your desired amount of remaining oranges from 20 with the syrup removed into 21. (This time we added 150 g of oranges. It would also be all right to place the oranges on top of the dairy cream instead of mixing them in.)
23. Flip over 18.
24. Remove the parchment paper slowly.
25. Flip over 24.
26. Cut off the end of the rolls diagonally. (Be careful with the directions of the little bears' faces!)
27. Paint 22 onto 26. Do not paint on the 2 cm at the end of the rolls.
28. Pick up the entire parchment paper and roll the cakes.
29. Twist the ends of the parchment paper to close the cakes.
30. Let it cool in the refrigerator for over 1 hours. If you cut a 500 ml plastic bottle to create a stand, the shape will turn out round and good.
31. Cut the cakes with a knife that has been warmed up, by placing it in hot water, for example. If you use paper towels to wipe the cream off the knife after every cut, you can get cleaner cuts. Also, the surface of the cake can get sticky, so it would be best to moisten your fingers before handling.
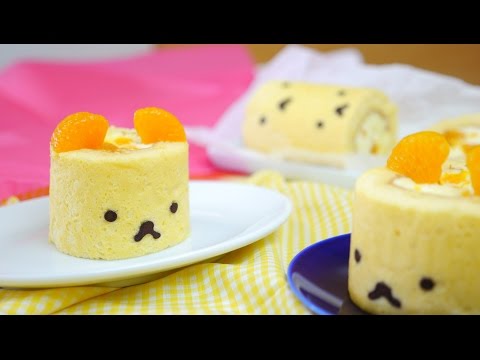
32. Garnish 31 with the oranges from 20 cut in half.
33. All done.
When we were cutting the cakes, we finally realized that we baked one with the little bear's face upside down! We made one little bear that is a bit odd. It looks like a yellow diglett!
日本語はこちら→ http://ameblo.jp/mosogourmet/entry-12...
Little Orange Bear Roll Cake みかんクマちゃんロールケーキ ─ Hey! It's Mosogourmet!! あっ、 妄想グルメだ!
<style>.embed-container { position: relative; padding-bottom: 56.25%; height: 0; overflow: hidden; max-width: 100%; } .embed-container iframe, .embed-container object, .embed-container embed { position: absolute; top: 0; left: 0; width: 100%; height: 100%; }</style><div class="embed-container"><iframe src="http://www.youtube.com/embed/l3npHixpVJk" frameborder="0" allowfullscreen></iframe></div>


