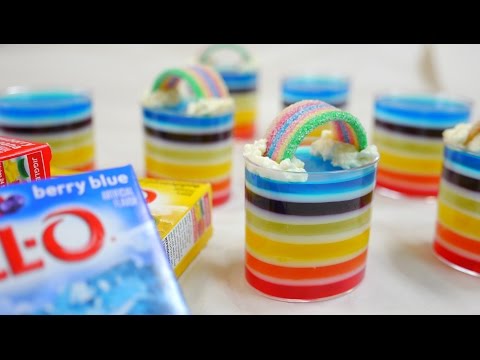
We made a rainbow colored jello using a mixture, so the only thing that is needed is patience, don’t try to rush it! It is a simple point, but it is very important to allow for each layer (especially the milk jelly layers) to properly harden, and to fully cool the jelly liquid before pouring it. We were worried about how it would taste with so many different flavors of jelly mixed together, but because of the milk jelly layers in between, the taste is quite nice. Random layers of jelly are also cute, but true gourmets will want to make sure to get all of the layers to be a matching thickness.
*Recipe* (makes seven servings of about 100ml each)
1. Make guidelines by marking on some easy to remove craft tape, and attach it to the mold. (sizes: color parts: 6mm, white parts: 3mm)
2. Make jelly using the Jello. For one part Jello add 2.1 parts hot water and mix, then allow to cool.
3. Make agar jelly using “Kanten papa” according to the instructions on the package. Agar jelly begins to harden around 50 degrees, so take care.
https://www.kantenpp.co.jp/shop/
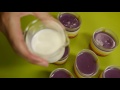
4. Make milk jelly. Dissolve 5g of gelatin in 30ml of water.
5. Without allowing it to reach boiling, melt the gelatin in the microwave.
6. Without allowing to boil, heat up 250ml of milk to about 60 degrees and add to the jelly in step 5.
7. Add 80g of sweetened condensed milk and stir, then cool.
8. As jellies harden, add colored jellies and milk jellies in alternating order. It depends on the size, but the jelly will generally harden after about an hour in the fridge, or twenty minutes in the freezer.
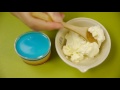
9. All done! This time, I made a cloud out of fresh cream, and added a gummy rainbow. I bought the rainbow gummy at PLAZA. I think that using fresh cream with a high fat content will provide some extra sweetness and make it easier to create some solid bubbles that look very cloud-like and make it easier to add the rainbows.
(Caution!) Gelatin based jelly and Agar based jelly will not stick together. We made it once using “Kanten papa” milk jelly, but when we added the next colored jelly, the milk jelly would rise above it. It has properties that mean it doesn’t stick, but we think the respective densities could also be a problem.
レインボーカラーのゼリー作ってみました。ゼリーの素を使うので、必要なのは忍耐だけ。せっかちはダメです。単純なことですが、ひとつひとつの層をしっかり固めること(特にミルクゼリー層)、ゼリー液をしっかり冷ましてから注ぐことがポイントです。こんなにいろんなフレイバーのゼリーを重ねて、味は大丈夫なの!?と心配でしたが、間のミルクゼリーのお陰で味がまとまりました。ゼリーの層はランダムもカワイイですが、キッチリと厚さをそろえるのが、妄想グルメ好みです。
*レシピ*(およそ100mlの容器 7個分)
1.剥がしやすいクラフトテープなどに目盛を付け、型に貼り準備しておく。(目盛はカラー部分:6ミリ、白い部分:3ミリ)
2.ジェローでゼリー液を作ります。ジェロー1に対し2.1倍の熱湯を加えて混ぜる。冷ましておく。
3.“かんてんぱぱ”の寒天ゼリーは表示通りに作ります。寒天ゼリーは50度ほどで固まり始めるので注意。
https://www.kantenpp.co.jp/shop/
4.ミルク味のゼリー液を作ります。ゼラチン 5gを水 30mlにふりい入れ、ふやかしておく。
5.沸騰しない程度に電子レンジにかけ、ゼラチンを溶かす。
6.沸騰しない程度に温めた(60度ほど)牛乳 250mlに5を加え混ぜる。
7.加糖練乳 80gを加え混ぜる。冷ましておく。
8.色ゼリー液とミルクゼリー液を交互になるように固めながら重ねていく。厚さにもよるが、冷蔵庫で1時間もしくは冷凍庫で20分ほどで固まる。
9.できあがり!今回は、生クリームを雲に見立てて、グミの虹をかけてみました。虹のグミはPLAZAで買いました。少し甘みを付けて固めに泡立てた生クリームは乳脂肪分が高めのものを使うと雲らしく、また虹がかけやすくなると思います。
(注意!)ゼラチン製のゼリーと寒天製のゼリーは、くっつきません。一度、“かんてんぱぱ”のミルクゼリーで作ったのですが、次の色ゼリーを注ぐとミルクゼリーが浮いてしまいました。くっかない性質もありますが、比重の問題もあるかもしれません。
Rainbow Cloud Jello 雲に虹が架かったゼリー ─ Hey! It's Mosogourmet!! あっ、 妄想グルメだ!

<style>.embed-container { position: relative; padding-bottom: 56.25%; height: 0; overflow: hidden; max-width: 100%; } .embed-container iframe, .embed-container object, .embed-container embed { position: absolute; top: 0; left: 0; width: 100%; height: 100%; }</style><div class="embed-container"><iframe src="http://www.youtube.com/embed/X5EPbFZxHr4" frameborder="0" allowfullscreen></iframe></div>